Archive for the ‘ entrees. ’ Category

Sugar braised pork

Earlier this week I had purchased a new cookbook called The Filipino American Kitchen by Jennifer M. Aranas. My parents are both from the Philippines, but I never officially learned how to make any Filipino dishes. My great aunt was always the one who cooked for us, so it never occurred to me until lately that I want to learn. The only thing I really knew how to make was chicken and pork adobo, which is really the simplest recipe ever. What made me purchase this specific cookbook was what it said on the cover — “Traditional Recipes, Contemporary flavors.” I like how the author incorporates traditional Filipino food with American — contemporary flavors. To some people, authentic Filipino food might not sit well with their taste buds, and so I would recommend this cookbook for those people. The cookbook has beautiful photographs of the food, and the recipes seem fairly simple, but do contain some ingredients that would have to be purchased at either an Asian grocery store, or in the international aisle at a market or grocery store. Continue reading

st. paddy’s day goodness.

happy late st. paddy’s day! i hope you all had your share of corned beef and cabbage. i know i did! i was really looking forward to st patrick’s day because i was going to be making my first corned beef brisket and cabbage (and potatoes, carrots, parnips). since cooking corned beef brisket usually takes hours, i decided to use the trusty crock pot. i had to work at 5 am, so before i left, i just popped everything in the crockpot, and hit go, and left it to do its magic. and magic did it do. the recipe i used was really a winner, incorporating carrots and parsnips, not just potatoes and cabbage, and also including a bottle of guiness! when i arrived home sometime around noon, i had to remove the parsnips and carrots, and pop in the potatoes and cabbage. my crock pot would barely hold it all, but i made do. the recipe suggested using a pineapple ham glaze to top the brisket, and broil for a few minutes. i did this, but not only did i do this, i decided to add bacon! what could make a dish better than it already is? bacon. just add bacon. that’s going to be my new motto — just add bacon. sounds good to me. so i cooked the bacon in the oven first for about 20 minutes, then when that was done, glazed the brisket, added the bacon, then added some more glaze. broil for only a few minutes, and make sure to not get distracted like i did. some of the bacon was burnt, but only a portion, so nothing to get crazy about. let me tell you. BEST. CORNED BEEF. EVER. it was soooo good. on st paddy’s day i usually eat it simply cooked with cabbage and potatoes, nothing fun, but always good, but i decided to do things different this year. do things different and you’ll almost always be glad you did (ALMOST, always). so i ate all this with a side of rice, cause i’m asian. i have to eat it with rice. =) it was great.

Continue reading

hawaiian at home.

When I was living in California, there was this little Hawaiian restaurant within walking distance from me — Hawaiian Drive Inn in Alameda, and i fell in love with it. My sister and brother in law introduced it to me as one of their “go to” spots — other than Chipotle. When I tasted it I couldn’t understand why Chipotle was even another option! Everything about this place was great (except for the soups, but come on, why order soup when there’s other delicious options). The first thing I decided to try there was the loco moco, which, if you aren’t familiar with Hawaiian meals, is two hamburger beef patties atop rice, and atop that two eggs any style and drenched in gravy. It’s such a delicious comfort food, and that’s what I loved about that restaurant. It was a small family run business, and the food tasted like good comfort home cooking. I tried most of the things off their menu, but it was the teriyaki steak and kalbi ribs that really got me hooked. Wait, it was also the BBQ chicken musubi and macaroni salad. Wait, I can’t forget the malasadas. Malasadas are Portuguese yeast donuts that are really popular in Hawaii. They are light and fluffy and fried and covered in sugar — um, yes please.

So anyways, where am I going with this? It’s been three months since I’ve eaten delicious Hawaiian food, and I’ve been craving it since I left. I figured that since the food there tasted so home made and comforting, than I could definitely make it at home and have it be just as good. So I decided to make a macaroni salad, malasadas, and the delicious teriyaki steak. It was definitely what I needed, but I’ll be honest, not as good as the Hawaiian Drive Inn. The steaks did turn out really full of flavor, and I’m sure they would have been bursting with flavor if I marinated them longer than two hours — overnight perhaps. I searched for different teriyaki sauce recipes, and I found a simple one that looked reliable at . I will definitely be going back to that recipe, because the flavor was perfect. Like I said, if I marinated the meat overnight, it would have been insanely good. I also wanted to use thin cut steak, but couldn’t find any, but the top round i used was just fine.


As for the macaroni salad, the restaurant’s had little bits of chicken in it, but I didn’t have any chicken, so it was just plain ol’ mac. I don’t think I seasoned it enough, as it tasted kind of bland, but nothing a little salt and pepper couldn’t fix up. The recipe I used was really simple, calling only for elbow macaroni, hellman’s mayonnaise, grated carrots, milk and salt & pepper. Simple.

And lastly, the malasadas. Oh my poor malasadas. They were nothing like the ones at the restaurant, but only because I don’t think I made them right. The dough never got to rise fully like it said it would in the recipe,but I went ahead and fried them anyways. They weren’t airy, and not as soft as they should have been, and pretty dark on the outside. Not terrible, but not amazing either.

Overall, the meal was tasty and filling, and I would make again, with some tweaks here and there. I know I’m going to work on my malasadas in the near future.

My first time with bagels.

So apparently February 9th was national bagel day, so what did I have to do? Make bagels! I’ve never made bagels before. I’m actually pretty new to baking breads in general. I’ve had this weird fear of yeast, and I think it stems back to a couple years ago where I wanted to try and make bialys but I failed to follow directions correctly, which in turn made the recipe a flop, which happened to be my first time using yeast. So since then, I was afraid of using yeast, but now I am breaking out of that shell, and want to use yeast as much as possible, because these bagels gave me hope! I was nervous, but I knew it had to be done. I turned to my King Arthur Flour All Purpose cookbook, flipped to the bagel section, and decided it was time. Unfortunately, I didn’t realize I threw out my bread flour a while ago when i was cleaning the cupboards, because it was old, so I had to trek out in the Chicago blizzard for some bread flour. I was determined (and I also didn’t feel like being trapped in the house all day, so it was a good excuse to leave).

I was actually pretty surprised at how easy this recipe was. I expected it to be difficult, but I was wrong. I only had to let the dough rise for about an hour and a half, then another 30 minutes after separating into 8 individual pieces. Then after that, I had to poke a hole in the middle of the dough to give it that bagel shape, which wasn’t too difficult. I think the hardest part of everything, was lifting the dough back up off of my pan without losing its shape. I will figure out a better method for it next time (oh and there will definitely be a next time, and a next time, and a next time.! ). And for anyone who didn’t know, bagels go into a quick hot water bath before getting baked. About 2 minutes on one side, and turn them over for another minute – although I have also read that it also depends on how chewy you like your bagels, to how long you should let them stay in the water. But its usually no more than 4 minutes.

So after the bath, I popped em onto a bakingt sheet, brushed on an egg white wash and sprinkled a good amount of sesame seeds onto the bagels. Then into the oven for about 25 minutes. I  was supposed to flip them over half way through in order to keep its puffiness, but oops, i forgot. I remembered when there was about 5 minutes left, so i did it anyways.  I admit, when I took them out, they weren’t as puffy as bagels should be, but it didn’t bother me much, because honestly, these bagels were great. They just screamed FRESH BAGELS! I’ve never had a fresher bagel in my life – and this was great. They had the right amount of chewiness, and the taste was so great. I will definitely make them again, perhaps this weekend. I’d love to make them with an everything topping, because that would just be the ultimate bagel.

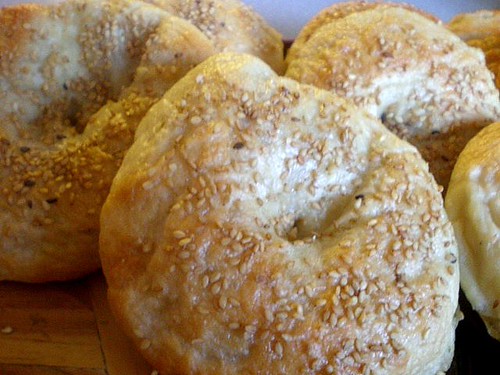
Highly recommend to anyone out there, to try and make their own bagels. It’s not difficult at all, and you will impress everyone you know by telling them you made your own bagels! And who doesn’t love bagels? In other news: I’ve had a ton of chorizo in my kitchen, and I want to use it up, so with some leftovers I decided to make chorizo burgers. I mixed them with ground turkey and ground beef, and they came out superb. I added a whole bunch of random spices to the mix, and then grilled them on a stovetop grill. And what better to go with chorizo burgers, than the lovely avocado. I maded a simple avocado slaw: green and purple cabbage, 2 avocados, a little bit of sour cream, cilantro, salt and pepper, and ta da! delicious avo-slaw. I popped these bad boys on a challah roll, and it was some seriously good eats.

What food is called for on Superbowl Sunday?

Chili! Obviously! And whats the one thing you have to have when you have chili? Cornbread! And what goes great with everything and makes everything better? Bacon! So the superbowl is a great excuse to cook up a big pot of chili and cornbread. My boyfriend saw this recipe for peanut butter chili on The Peanut Butter Boy and demanded i make it. First of all, for all of you who are thinking "peanut butter in chili?" don’t fret, because it is seriously delicious. I put way more peanut butter than was called for in the recipe, because I also just started adding a bunch of random stuff into the pot. I could taste just a hint of peanut butter in the chili and let me tell you, it is good. The recipe calls for lean ground turkey and lean ground pork, and instead i used 1/2 lb of ground turkey, 1/2 lb ground beef and 1/2 lb of chorizo pork. i thought the chorizo would help add to the spice of the chili. For some reason I couldn’t get the chili to a spice level i was comfortable with. I like my chili realllly spicy, and this wasn’t that spicy. ( I added tons of chili powder, and added hot sauce as well to help make it a little spicier). I really love making chili though, because I like adding everything but the kitchen sink into it. And no matter what I add, and how much, it only tastes better after each test. As for the cornbread, Flour girl tweeted a recipe last week or so about a bacon cornbread she was baking. I saw the picture, and knew I had to bake it. I could eat cornbraed all day, and with everything. And what better way to make it with bacon! It was a recipe from The Bread Baker’s Apprentice, which I really need to get my hands on this week. The recipe stated to soak the cornmeal in buttermilk overnight, and I completely forgot to do that, so luckily I was able to soak it for about 4 hours this morning. This is probably a necessary step in order to make the cornbread deliciously moist. I was able to make oven baked bacon for the first time ever today, and let me tell you, I am never going to fry bacon again ever. It was sooo easy, and the bacon turned out PERFECT. I highly recommend to all you bacon lovers, that you bake your bacon, because you will not be disappointed. This will make you love bacon even more than you already do, and I know you never thought that was possible. must serve chili and cornbread with beer. so yum. look at those delicious perfectly crisped slices of bacon. they barely shrunk, AND i didn’t have to suffer through the splashing bacon grease. and clean up is a breeze =)

bacon cornbread recipe:
from The Bread Baker’s Apprentice

from Peter Reinhart’s The Bread Baker’s Apprentice.

1 cup (6 oz) coarse cornmeal
2 cups (16 oz) buttermilk
8 oz bacon (approx. 10 slices)
1 3/4 cups (8 oz) flour
1 1/2 Tbsp (.05 oz) baking powder
1/4 tsp (.16 oz) baking soda
1 tsp (.25 oz) salt
1/4 cup (2 oz) white sugar
1/4 cup (2 oz) brown sugar
3 eggs
2 Tbsp (1.5 oz) honey
2 Tbsp (1 oz) butter, melted
2 1/2 cups (16 oz) corn kernels (fresh or frozen)
2 Tbsp (1 oz) bacon fat or vegetable oil)

1. the night before making the bread, soak the cornmeal in the buttermilk. cover and leave at room temperature overnight.

2. the next day, fry the bacon or cook it in the oven. drain off the fat into a can or bowl and save for greasing the pan. when the bacon has cooled, crumble it into coarse pieces.

3. preheat the oven to 350. sift together the flour, baking powder, baking soda and salt in a mixing bowl. stir in the sugar and brown sugar. in another bowl, lightly beat the eggs. dissolve the honey in the melted butter and then stir the warm honey-butter mixture into the eggs. add this to the soacked cornmeal mixture.

4. add the wet mixture to the flour mixture and stir with a large spoon until all the ingredients are evenly distributed and the batter is blended and smooth. stir in the corn kernels until they are even distributed.

4. place 2 Tbsp of the bacon fat in 10 inch cake pan or a 9×13 inch baking pan. place the pan in the oven for 5 to 7 minutes, or until the fat gets very hot. remove the pan, tilt the pan to coat the bottom and sides and pour in the batter. sprinkle the crumbled bacon on top, gently pressing them into the batter.

5. bake at 350 F for about 30 minutes, until the bread is firm and a tester comes out clean. allow the bread to cool in the pan for at least 15 minutes before slicing and serving. for muffins, fill muffin tins to the top and bake at 350 F for the same amount of time.

Oven-Baked Bacon

preheat oven to 400 degrees Farenheit.
line a rimmed baking sheet with parchment paper and evenly lay out the bacon. (i was able to fit approx 10 slices)
put on the center rack of the oven and bake for about 20 minutes, or until the top and bottom of the bacon are evenly browned. (you’ll be able to know when it’s done, bake to you’re preferred level of crispiness).

I’d also like to thank Jamie of My Baking Addiction for randomly choosing me as her Rose’s Heavenly Cakes book giveaway!

I am super stoked, as I have never won anything in my life! And I knew this was a book I had to add to my cookbook collection. I’ll be eagerly awaiting it’s arrival, and prepared to bake some beautiful delicious cakes!